I Bake. And Cook?

The Trials and Tribulations of a Baker-Turned-Cook

Monday, March 17, 2008

Stay Tuned!

Between work, my last semester of grad school coursework, and other exciting developments, I have had no free time! When you add to that the fact that my laptop is broken and had to be sent away for who knows how long, it means not much blogging has been going on (although the cooking and baking have continued).

But fear not! There are good things to come! I am on break this week with no intentions except to relax and catch up on stuff at home.

Here's a taste of what's to come:
  • Coconut Shrimp with Pineapple Salsa
  • Strawberry Shortcake
  • Mashed Sweet Potatoes
  • Carrot Cake

Sunday, February 24, 2008

Cinnamon Goodness...

These cinnamon rolls are gooey and fantastic. I always double the icing, because the more icing, the better in my book. :) These are a bit labor intensive, but most of the work is done the night before.

Before icing:


After icing:

Overnight Cinnamon Rolls

Source: Good Eats

Dough:

  • 4 large egg yolks, room temperature
  • 1 large whole egg, room temperature
  • 2 ounces sugar (approximately 1/4 C)
  • 3 ounces unsalted butter, melted (approximately 6 tablespoons)
  • 6 ounces buttermilk, room temperature (approximately 3/4 of a cup)
  • 20 ounces all-purpose flour (approximately 4 C), plus additional for dusting
  • 1 package instant dry yeast (approximately 2 1/4 teaspoons)
  • 1 1/4 teaspoons kosher salt
  • vegetable oil or cooking spray

Filling:

  • 8 ounces light brown sugar (approximately 1 cup packed)
  • 1 tablespoon ground cinnamon
  • pinch salt
  • 3/4 ounce unsalted butter, melted (approximately 1 1/2 Tbsp.)

Icing: (I double this recipe)

  • 2 1/2 ounces cream cheese (approximately 1/4 C)
  • 3 tablespoons milk
  • 5 1/2 ounces powdered sugar (approximately 1 1/2 C)

  1. For the dough: in the bowl of a stand mixer with the whisk attachment, whisk the egg yolks, whole egg, sugar, butter, and buttermilk. Add approximately 2 cups of the flour along with the yeast and salt; whisk until moistened and combined. Remove the whisk attachment and replace with a dough hook. Add all but 3/4 cup of the remaining flour and knead on low speed for 5 minutes. Check the consistency of the dough, add more flour if necessary; the dough should feel soft and moist but not sticky. Knead on low speed 5 minutes more or until the dough clears the sides of the bowl. Turn the dough out onto a lightly floured work surface; knead by hand about 30 seconds. Lightly oil a large bowl. Transfer the dough to the bowl, lightly oil the top of the dough, cover and let double in volume, 2 to 2 1/2 hours.
  2. Combine the brown sugar, cinnamon and salt in a medium bowl. Mix until well incorporated. Set aside until ready to use.
  3. Butter a 9 by 13-inch glass baking dish. Turn the dough out onto a lightly floured work surface. Gently shape the dough into a rectangle with the long side nearest you. Roll into an 18 by 12-inch rectangle. Brush the dough with the 3/4-ounce of melted butter, leaving 1/2-inch border along the top edge. Sprinkle the filling mixture over the dough, leaving a 3/4-inch border along the top edge; gently press the filling into the dough. Beginning with the long edge nearest you, roll the dough into a tight cylinder. Firmly pinch the seam to seal and roll the cylinder seam side down. Very gently squeeze the cylinder to create even thickness. Using a serrated knife, slice the cylinder into 1 1/2-inch rolls; yielding 12 rolls. Arrange rolls cut side down in the baking dish; cover tightly with plastic wrap and store in the refrigerator overnight or up to 16 hours.
  4. Remove the rolls from the refrigerator and place in an oven that is turned off. Fill a shallow pan 2/3-full of boiling water and set on the rack below the rolls. Close the oven door and let the rolls rise until they look slightly puffy; approximately 30 minutes. Remove the rolls and the shallow pan of water from the oven.
  5. Preheat the oven to 350 degrees F.
  6. When the oven is ready, place the rolls on the middle rack and bake until golden brown, or until the internal temperature reaches 190 degrees F on an instant-read thermometer, approximately 30 minutes.
  7. While the rolls are cooling slightly, make the icing by whisking the cream cheese in the bowl of a stand mixer until creamy. Add the milk and whisk until combined. Sift in the powdered sugar, and whisk until smooth. Spread over the rolls and serve immediately.

Chicken Stew

I love this Giada recipe. It is so fresh and healthy, yet feels hearty. It also reheats very well for lunch or dinner the next day. I served it with cornbread.


Chicken Stew
  • 2 Tbsp. olive oil
  • 2 stalks celery, chopped
  • 1 carrot, peeled and chopped
  • 1 small onion, chopped
  • salt and freshly ground black pepper
  • 1 (14-oz) can chopped tomatoes
  • 1 (14-oz) can low-sodium chicken broth
  • 1/2 C fresh basil leaves, torn into pieces
  • 1 Tbsp. tomato paste
  • 1 bay leaf
  • 1/2 tsp. dried thyme leaves
  • 2 chicken breast with ribs (about 1 1/2 lbs total)
  • 1 (15 oz) can organic kidney beans, drained (rinsed if not organic)
  • Serving suggestion: Crusty bread
  1. Heat the oil in a heavy 5 1/2-quart saucepan over medium heat. Add the celery, carrot, and onion. Saute the vegetables until the onion is translucent, about 5 minutes. Season with salt and pepper, to taste. Stir in the tomatoes with their juices, chicken broth, basil, tomato paste, bay leaf, and thyme. Add the chicken breasts; press to submerge.
  2. Bring the cooking liquid to a simmer. Reduce the heat to medium-low and simmer gently uncovered until the chicken is almost cooked through, turning the chicken breasts over and stirring the mixture occasionally, about 25 minutes. Using tongs, transfer the chicken breasts to a work surface and cool for 5 minutes. Discard the bay leaf. Add the kidney beans to the pot and simmer until the liquid has reduced into a stew consistency, about 10 minutes.
  3. Discard the skin and bones from the chicken breasts. Shred or cut the chicken into bite- size pieces. Return the chicken meat to the stew. Bring the stew just to a simmer. Season with salt and pepper, to taste.
  4. Ladle the stew into serving bowls and serve with the bread.

Coconut Layer Cake with Coconut Buttercream Frosting

I have been wanting to try this Martha Stewart recipe for awhile. The cake was delicious, but soooo dense. I made it into a three-layer round cake instead of a two-layer sheet cake. I used my tried-and-true buttercream recipe (adapted from AllRecipes). How could something with that much butter and eggs be anything less than divine?


Coconut Cake

Source: Martha Stewart's Baking Handbook (2005)

  • 3 sticks (1 1/2 C) unsalted butter, room temperature, plus more for pans
  • 3 1/2 C all-purpose flour, plus more for pans
  • 1 Tbsp. plus 1 tsp. baking powder
  • 1 tsp salt
  • 1 C packed sweetened, shredded coconut (for cake batter)
  • 2 C packed, sweetened, shredded coconut (for cake topping)
  • 2 2/3 C sugar
  • 4 large whole eggs, plus 4 large egg whites
  • 1 Tbsp. pure vanilla extract
  • 1 1/2 C unsweetened coconut milk
  1. Preheat the oven to 350. Butter two 9x9x2 inch cake pans (I used three 9-inch round pans); line the bottoms with parchment paper. Butter parchment, and dust with flour, tapping out excess; set aside. Into a large bowl, sift together the flour, baking powder, and salt. Pulse shredded coconut in a food processor until finely chopped. Stir chopped coconut into the flour mixture until combined; set aside.
  2. In the bowl of an electric mixer fitted with the paddle attachment, beat the butter and sugar until light and fluffy, about 4 minutes, scraping down the sides of the bowl as needed. Add the whole eggs, egg whites, and vanilla; beat until fully incorporated. With the mixer on low speed, add the flour mixture in two parts, alternating with the coconut milk, and beginning and ending with the flour; beat until combined after each addition.
  3. Divide batter between prepared pans, and smooth with an offset spatula. Bake, rotating pans halfway through, until cakes are golden brown and a cake tester inserted in the centers comes out clean, about 55 minutes. Transfer pans to a wire rack to cool 30 minutes. Invert cakes onto the rack; peel off the parchment. Reinvert cakes and let them cool completely, top sides up.
  4. While cake is cooling, toast 2 C shredded coconut in a 350 oven for 8 to 10 minutes, stirring occasionally.
  5. Using a serrated knife, trim the tops of the cake layers to make level. Place one layer on a cake plate, and spread top with 1 1/2 C of frosting. Sprinkle with toasted coconut. Repeat with second layer. Place third layer on top, and frost cake with remaining frosting. Sprinkle remaining toasted coconut on top.
  6. Cake can be kept in the refrigerator, covered with a cake dome, for up to 3 days.

Coconut Buttercream Frosting

Adapted from AllRecipes.com

  • 1/2 C butter
  • 1/2 C shortening
  • 1/8 tsp. salt
  • 1 tsp. coconut extract
  • 5 C powdered sugar
  • 1/4 C milk
  1. In a large bowl, cream butter and shortening until light and fluffy. Add salt, coconut extract, powdered sugar, and milk. Beat well.


Tuesday, February 5, 2008

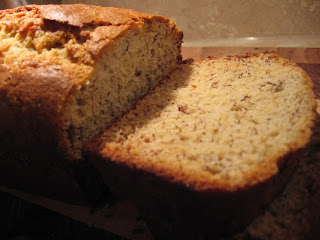
Banana Bread

I love this recipe for banana bread because it is light and there are no spices to mask the banana flavor. And unlike most bread recipes that make two loaves (leaving me with an extra loaf every time), this one just makes one -- perfect for two people.

Toni's Banana Bread
Source: Cooking Light
  • 1 cup mashed ripe banana (about 2 medium)
  • 2/3 C sugar
  • 1/4 C vegetable oil
  • 1 large egg white
  • 1 large egg
  • 1 3/4 C all-purpose flour
  • 1 1/4 tsp. cream of tartar
  • 3/4 tsp. baking soda
  • 1/2 tsp. salt
  • Cooking spray
  1. Preheat oven to 350°.
  2. Combine first 5 ingredients in a large bowl; beat with a mixer at medium speed until smooth.
  3. Lightly spoon flour into dry measuring cups, and level with a knife. Combine flour, cream of tartar, baking soda, and salt in a bowl, stirring with a whisk. Add the flour mixture to banana mixture, stirring just until moist. Spoon the batter into an 8 x 4-inch loaf pan coated with cooking spray.
  4. Bake at 350° for 40 minutes or until a wooden pick inserted in center comes out clean. Cool 10 minutes in pan on a wire rack; remove from pan. Cool completely on rack.

Note: To freeze individual slices, place in heavy-duty zip-top plastic bags. Remove excess air from bags; seal and freeze for up to 1 month. To thaw, let stand at room temperature.

Chicken Enchilada Casserole

This dish is quite spicy, but so satisfying. The original recipe calls for traditional enchiladas (rolled and placed side-by-side in a dish), but I find it is much easier to make a casserole. My changes are listed below; click here for the original recipe.

Chicken Enchilada Casserole
Adapted from Tyler Florence's Chicken Enchiladas

  • 3 tablespoons vegetable oil
  • 1 1/2 pounds skinless boneless chicken breast
  • Salt and pepper
  • 2 teaspoons cumin powder
  • 2 teaspoons garlic powder
  • 1 teaspoon Mexican Spice Blend
  • 1 red onion, chopped
  • 2 cloves garlic, minced
  • 1 cup frozen corn, thawed
  • 5 canned whole green chiles, seeded and coarsely chopped
  • 4 canned chipotle chiles, seeded and minced
  • 1 (28-ounce) can diced tomatoes
  • 1/2 teaspoon all-purpose flour
  • 18 corn tortillas
  • 1 can enchilada sauce
  • 2 cups shredded Cheddar and Jack cheeses
  • Garnishes: chopped cilantro leaves, chopped scallions, sour cream, chopped tomatoes
  1. Coat large saute pan with oil. Season chicken with salt and pepper. Brown chicken over medium heat, allow 7 minutes each side or until no longer pink. Sprinkle chicken with cumin, garlic powder and Mexican spices before turning. Remove chicken to a platter, allow to cool. Saute onion and garlic in chicken drippings until tender. Add corn and chiles. Stir well to combine. Add canned tomatoes, saute 1 minute. Pull chicken breasts apart by hand into shredded strips. Add shredded chicken to saute pan, combine with vegetables. Dust the mixture with flour to help set.
  2. Ladle a small amount of enchilada sauce into the bottom of a 9 x 13 glass baking dish. Layer six corn tortillas on top of the sauce. Spread half of the chicken mixture over the tortillas and top with 3/4 C cheese. Repeat layering -- six more corn tortillas, remaining chicken, 3/4 C cheese. Top with the remaining six tortillas. Pour the enchilada sauce over the top, and sprinkle remaining 1/2 C cheese over the top.
  3. Bake for 20 minutes in a preheated 350 degree F oven until cheese melts. Serve with sour cream.

Chicken Piccata

This dish has so much flavor! I serve it over couscous to soak up the delicious juices. I usually cut down on the butter and oil used, and I have not noticed a big difference.

Chicken Piccata
Recipe from Giada DeLaurentis
  • 2 skinless and boneless chicken breasts, butterflied and then cut in half
  • Sea salt and freshly ground black pepper
  • All-purpose flour, for dredging
  • 6 tablespoons unsalted butter
  • 5 tablespoons extra-virgin olive oil
  • 1/3 cup fresh lemon juice
  • 1/2 cup chicken stock
  • 1/4 cup brined capers, rinsed
  • 1/3 cup fresh parsley, chopped
  1. Season chicken with salt and pepper. Dredge chicken in flour and shake off excess.
  2. In a large skillet over medium high heat, melt 2 tablespoons of butter with 3 tablespoons olive oil. When butter and oil start to sizzle, add 2 pieces of chicken and cook for 3 minutes. When chicken is browned, flip and cook other side for 3 minutes. Remove and transfer to plate. Melt 2 more tablespoons butter and add another 2 tablespoons olive oil. When butter and oil start to sizzle, add the other 2 pieces of chicken and brown both sides in same manner. Remove pan from heat and add chicken to the plate.
  3. Into the pan add the lemon juice, stock and capers. Return to stove and bring to boil, scraping up brown bits from the pan for extra flavor. Check for seasoning. Return all the chicken to the pan and simmer for 5 minutes. Remove chicken to platter. Add remaining 2 tablespoons butter to sauce and whisk vigorously. Pour sauce over chicken and garnish with parsley.